
Quick Answer: To read a glass bottle technical drawing, start by verifying the four critical neck finish dimensions (T, E, I, and H) to ensure your closures will fit perfectly. Next, check the overall height, maximum diameter, and label panel flatness. Always pay attention to the ± tolerance values, as they dictate how the bottle will perform on automated filling and labeling lines.
- A technical drawing is the binding contract between you and the manufacturer regarding the bottle’s physical specifications.
- The T, E, I, and H neck finish dimensions are the most critical parameters for ensuring a leak-proof seal with your chosen caps.
- Tolerances (e.g., ±1.5mm) are unavoidable in glass manufacturing; your filling and labeling equipment must be able to accommodate them.
- Always check the center of gravity and label panel curvature before approving a mold to prevent tipping and label wrinkling on the production line.
Are you approving glass bottle blueprints without fully understanding the numbers on the page? For many procurement managers, receiving a technical drawing from a glass manufacturer can feel like reading a foreign language. However, this document is the single most important piece of paper in your custom packaging project. Approving a drawing with mismatched neck dimensions or unrealistic tolerances can lead to thousands of dollars in wasted closures, production line jams, and delayed product launches. This guide breaks down every section of a glass bottle technical drawing and explains exactly what to verify before you sign off on a custom mold.
What are the core components of a glass bottle technical drawing?
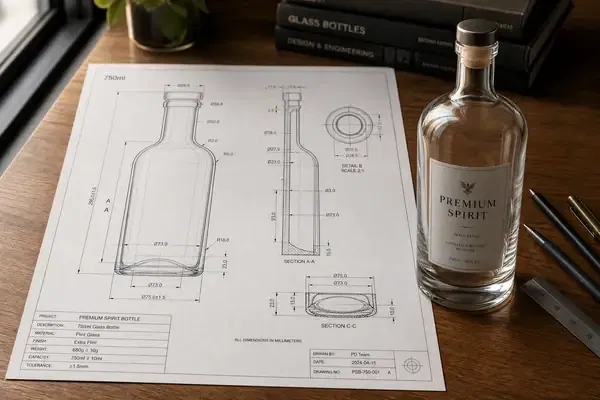
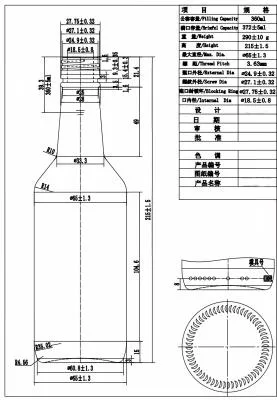
A standard glass bottle technical drawing consists of multiple views and a detailed title block, each serving a specific purpose. The Front View (or Main View) outlines the overall height (H), maximum diameter (D), and the label panel dimensions. This view gives you the most accurate representation of the bottle’s physical presence on the shelf. Adjacent to this, you will typically find the Bottom View, which details the push-up (the concave indentation at the base) and any stippling — the small bumps on the bottom that prevent the bottle from sliding on wet conveyor belts.
Equally important is the Cross-Section View, which reveals the internal profile of the bottle. This view is crucial for understanding the glass wall thickness distribution, especially in the shoulder and base areas where thermal shock or impact breakage is most likely to occur. Finally, the Title Block in the corner contains essential metadata: the nominal capacity (the volume of liquid the bottle is designed to hold), the brimful capacity (the volume if filled to the absolute top), and the estimated glass weight. These three numbers are the foundation of your product specification sheet and your shipping cost calculations.
A Glimpse into Glass History: Before Computer-Aided Design (CAD) software became widespread in the 1980s, glass bottle blueprints were meticulously hand-drawn on vellum by skilled draftsmen. A single arithmetic error in calculating the neck finish radius could result in a cast-iron mold that had to be entirely scrapped — at a cost equivalent to several months of a worker’s wages. Today, software calculates volume and weight instantly, but the fundamental dimensional standards established by the Glass Packaging Institute (GPI) in the mid-20th century remain the global industry benchmark.
How do you decode the neck finish dimensions (T, E, I, and H)?
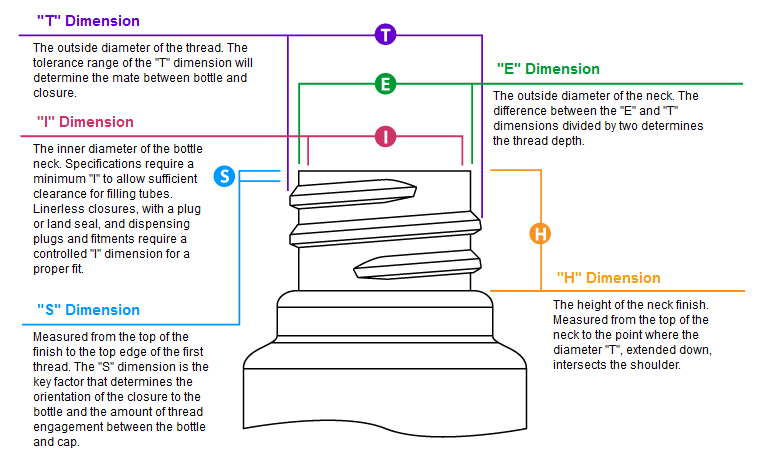
The neck finish detail is the most critical part of the drawing because it dictates whether your closures will seal correctly. The T-Dimension represents the outside diameter of the continuous thread — the widest part of the threaded area. The E-Dimension is the outside diameter of the neck measured across the root of the threads, which is the narrowest point of the threaded zone. Together, the T and E dimensions define the thread profile that a screw cap must engage with. If the T-dimension on your bottle drawing does not match the T-dimension specified by your closure supplier, the cap will either strip or fail to tighten fully, leading to leakage in transit. [1]
The I-Dimension specifies the inner diameter of the bottle opening at the very top of the finish. This is vital if your packaging requires a plug, cork, dropper insert, or pour spout, as these components must fit snugly inside the neck without rocking. Finally, the H-Dimension measures the height of the neck finish from the top of the opening down to the transfer bead (the horizontal ridge that separates the finish from the shoulder). If you are using a Roll-on Pilfer Proof (RoPP) aluminum closure or a tamper-evident band, the H-dimension must align precisely with the cap’s skirt length to ensure the tamper band tucks securely under the transfer bead. An H-dimension that is even 1mm too short can result in a tamper band that does not engage, which will fail retail compliance inspections. [2]
| Dimension | What It Measures | Why It Matters to Buyers | Typical Tolerance |
|---|---|---|---|
| T-Dimension | Outside diameter of the thread crest | Must match the cap’s internal thread diameter exactly to prevent stripping or leakage. | ±0.3–0.5mm |
| E-Dimension | Outside diameter of the neck root (between threads) | Determines the clearance for the cap’s inner wall; too tight causes cracking on application. | ±0.3–0.5mm |
| I-Dimension | Inside diameter of the bottle opening | Crucial for droppers, corks, pourers, and filling nozzles — must allow smooth insertion. | ±0.5mm |
| H-Dimension | Height of the neck finish to the transfer bead | Dictates the fit for tamper-evident bands and RoPP closures; must match the cap skirt length. | ±0.5mm |
For buyers sourcing custom bottles for spirits or cosmetics, it is strongly recommended to cross-reference your drawing’s neck finish code (e.g., GPI 28-400) with the GPI finish standard chart before approving. This single verification step eliminates the most common and costly mismatch in custom glass bottle projects. You can find a detailed reference guide in our article on how to prevent liquor bottle leakage through proper closure and neck finish selection.
Why do manufacturing tolerances matter so much for your production line?
Tolerances are the permissible limits of variation in a physical dimension, and in glass manufacturing, they are an unavoidable physical reality. Unlike machined metal or injection-molded plastic, glass is a molten material that is blown or pressed into shape at temperatures exceeding 1,000°C, meaning no two bottles are perfectly identical at the micron level. On your drawing, you will see values such as “Height: 250mm ± 1.5mm,” meaning the factory guarantees the bottle will measure between 248.5mm and 251.5mm tall. If your automated filling machine cannot adjust for a 3mm total variance in height, the filling nozzles may crash into taller bottles or underfill the shorter ones — causing costly line stoppages.
Capacity tolerances are equally critical, especially for spirits and pharmaceuticals where regulatory bodies mandate strict volume accuracy. A standard 750ml liquor bottle might carry a capacity tolerance of ±5ml. You must confirm that this variance aligns with your local labeling laws and your filling equipment’s precision settings. Weight tolerances (often ±5% to ±10%) can also impact your shipping calculations: a batch running consistently heavy could push a pallet over its declared weight limit, resulting in unexpected freight surcharges or customs re-inspection. [3]
From Our Order Files: The Cost of Ignoring Label Panel Tolerances. A beverage brand in South America sourced custom 500ml juice bottles and approved the drawings without carefully reviewing the label panel curvature tolerance. When the first production run arrived, the ±2mm variance on the curved label area caused their automated labeling machine to apply stickers with severe wrinkles across 20,000–30,000 units. Working with their engineering team, we redesigned the mold to flatten the label panel slightly and tightened the tolerance to ±1mm. The revised bottles ran cleanly on their high-speed line from the very first pallet of the second order.

What are the red flags to look for before approving a drawing?
Before signing off on a blueprint, always check the center of gravity (CG). A bottle with a high center of gravity — such as a tall, slender design with a narrow base — is prone to tipping over on high-speed conveyor belts. This can cause catastrophic line jams and glass breakage. If the CG is located in the upper half of the bottle, ask the manufacturer to add more glass weight to the base (a “heavy base” design) to lower the center of gravity and improve stability. Most reputable manufacturers will calculate and annotate the CG on the drawing automatically; if it is missing, request it before approval.
A second common red flag is an undersized or over-curved label panel. The drawing will specify the maximum height and width of the flat area intended for your pressure-sensitive label. If your marketing team has designed a label that is taller than this designated area, the edges of the sticker will bridge across the curvature of the bottle’s shoulder or base, resulting in unsightly creases and potential delamination on the shelf. Always overlay your label dieline onto the bottle’s front view drawing to verify a clean fit before authorizing mold production. For a deeper look at how custom bottle costs are structured once you move past the drawing stage, our guide on custom liquor bottle pricing and MOQ covers the full procurement picture.
Conclusion: The Drawing Is Your Contract
Understanding a glass bottle technical drawing is not just an engineering exercise — it is a critical procurement skill that protects your budget and your production timeline. By mastering the neck finish dimensions, respecting manufacturing tolerances, and identifying design red flags before mold production begins, you can ensure that your custom packaging project moves smoothly from concept to the retail shelf without costly surprises.
If you are planning a new product launch and need help navigating custom bottle designs, we would be glad to share how GlassyPack simplifies the engineering process. Our technical team provides clear, fully annotated 2D and 3D blueprints and will walk you through every dimension to ensure perfect compatibility with your closures and filling lines. Contact us at sales@glassypack.com or visit our Contact Us page to request a free design consultation.
FAQ
Nominal capacity is the intended commercial fill volume (e.g., 750ml), which is the amount of liquid the bottle holds when filled to the correct fill line. Brimful capacity is the absolute maximum volume the bottle can hold if filled to the very top edge of the opening — it is always higher than the nominal capacity and is used to calculate headspace.
Because glass is formed from a molten state at temperatures exceeding 1,000°C, minor variations during cooling and molding are physically unavoidable. Tolerances define the acceptable range of these variations to ensure the bottles still function correctly on your filling, capping, and labeling lines.
Compare the T, E, I, and H dimensions on the bottle drawing with the corresponding specifications provided by your closure manufacturer. The most critical check is ensuring the bottle’s T-dimension matches the cap’s internal thread diameter. When in doubt, request a physical sample of both the bottle and the cap and perform a manual torque test before approving the mold.
The push-up (also called the punt) is the concave indentation at the bottom of the bottle. It adds structural strength to the base, helps the bottle stand flat on uneven surfaces, and can make the bottle appear larger or more premium from the side. For sparkling beverages, a deep push-up also helps distribute internal pressure more evenly.
Yes, but tighter tolerances require slower production speeds, more frequent mold maintenance, and higher quality-control rejection rates. This will typically result in a higher unit cost. Discuss the trade-off with your manufacturer before requesting non-standard tolerances — in many cases, calibrating your filling equipment to accommodate standard tolerances is more cost-effective.
The GPI (Glass Packaging Institute) finish code is a standardized alphanumeric designation for neck finish dimensions, such as “28-400” (28mm diameter, 400 thread style). It is typically noted in the neck finish detail view or the title block. This code allows you to cross-reference your bottle with a standard closure catalog to confirm compatibility without custom-measuring every dimension manually.
References
[1] Paramount Global. Guide to Bottle Neck Finishes, Thread Sizes, and Dimensions. https://www.paramountglobal.com/knowledge/bottle-neck-thread-finish/
[2] CETIE. Finish Data Sheets (GME Series) — Glass and PET Finish Dimensions and Tolerances. https://www.cetie.org/en/finish-data-sheets-gme_102.html
[3] C.L. Smith Company. Understanding Neck Finish Dimensions. https://www.clsmith.com/neck-finish-dimensions/