Do you have empty wine bottles in your home and do not know what to do with them? Or maybe you are intentionally collecting empty bottles so that you can repurpose them into wine bottle decor? Whichever the case, the diverse nature of wine/glass bottles makes them ideal for creating versatile bottles decor.
So if you are wondering what to do with empty wine bottles and are looking for wine bottle craft ideas, you have come to the right place! Because today, you are going to learn 10 wine bottle paint crafts you can try in your own home. Let us now start with our list and awaken the artist within you!
1.Cleaning and Preparing the Bottles
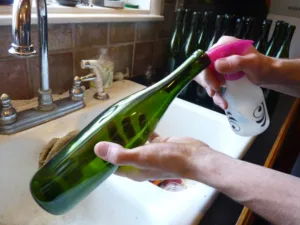
Rinse the bottle with warm water inside and out to remove any remaining wine or wine labels. Add some mild detergent or dishwashing liquid to the water, then use a brush or sponge to thoroughly clean the inside and outside of the bottle. Make sure to wash all surfaces of the bottle thoroughly, especially the mouth and bottom. Rinse the bottle thoroughly with clean water to ensure the detergent is completely removed. Place the bottle upside down on a rack or towel to dry. Make sure the bottle is completely dry inside and out for the rest of the painting process.
2.How To Paint Glass Bottles
Now for the fun part: unleashing your creativity! Any type of paint will stick to glass, but acrylic, spray paint, and chalk paint are some of the most commonly used. Check out these unique ideas on how you can decorate your glass jars:
1.Ombre Effect
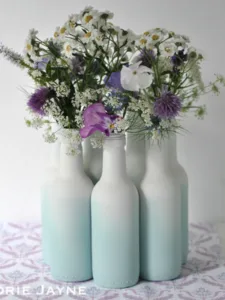
1.Start with the Darker Shade: Begin by applying the darkest shade of paint to the bottom of the bottle. You can use a paintbrush or sponge brush to apply the paint evenly. Make sure to cover the entire bottom section of the bottle with this color.
2.Blend the Colors: While the paint is still wet, gradually blend in the next lighter shade of paint above the first color. Use a clean brush or sponge brush to feather the edges where the colors meet, creating a smooth transition between the two shades.
3.Continue Layering: Repeat the process with each subsequent lighter shade of paint, gradually working your way up the bottle. Remember to blend each color into the previous one to create a seamless ombre effect.
4.Allow to Dry: Once you’ve achieved the desired ombre effect, allow the paint to dry completely. Depending on the type of paint you’re using, this may take several hours or overnight.
5.Optional: Seal the Paint: If desired, you can seal the painted surface of the bottle with a clear sealant or varnish to protect the paint and add a glossy finish.
6.Display or Use: Once the paint is dry and sealed (if applicable), your ombre-effect glass bottle is ready to be displayed as a decorative accent or used for storing items like flowers, candles, or beverages.
2.Marbled Design
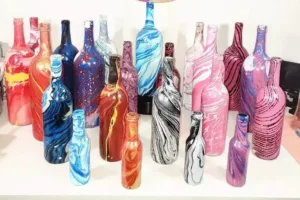
1.Prepare the Paint: Pour each color of paint into separate containers. Add a few drops of water to each color to thin it out slightly and make it easier to work with. Stir the paint gently to ensure it is well-mixed and smooth.
2.Apply the Base Coat: Start by applying a base coat of one color of paint to the entire surface of the glass bottle. Use a paintbrush or sponge brush to apply the paint evenly and cover the entire surface.
3.Add the Marbling: Once the base coat is dry, drip small amounts of the different colors of paint onto the surface of the bottle. You can use a dropper, toothpick, or small brush to create dots or lines of paint on the surface.
4.Swirl the Colors: Use a toothpick, skewer, or the end of a paintbrush to gently swirl the colors together on the surface of the bottle. Create swirling patterns or random designs by dragging the tool through the paint.
5.Rotate the Bottle: Rotate the bottle slowly as you swirl the colors to ensure that the marbled pattern covers the entire surface evenly. Continue swirling and rotating until you are satisfied with the design.
6.Allow to Dry: Once you’ve achieved the desired marbled effect, allow the paint to dry completely. Depending on the type of paint used and the thickness of the layers, this may take several hours or overnight.
3.Floral Patterns
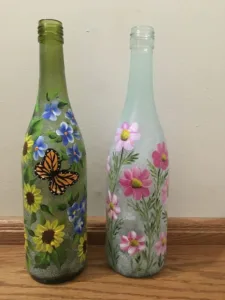
1.Sketch the Design: Before you begin painting, lightly sketch the floral design onto the glass bottle using a pencil. You can draw simple flowers, leaves, and stems, or create more intricate designs depending on your skill level and preference.
2.Paint the Base Coat: Start by applying a base coat of paint to the areas where you want your flowers to be. This will help the colors of your flowers to stand out and prevent the glass from showing through.
3.Paint the Flowers: Begin painting the flowers using a small brush. Start with the petals, using gentle strokes to create the desired shape and texture. You can layer different colors to add depth and dimension to your flowers.
4.Add Details: Once the petals are dry, add details such as centers, veins, and highlights to the flowers using a finer brush or paint marker. This will help to enhance the realism of your floral design.
5.Paint the Leaves and Stems: Next, paint the leaves and stems of your flowers using green paint. You can use a variety of shades to create depth and dimension in your design.
6.Allow to Dry: Once you’ve completed your floral design, allow the paint to dry completely. Depending on the type of paint you’re using, this may take several hours or overnight.
4. Geometric Shapes
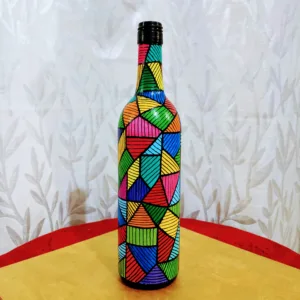
1.Plan Your Design: Decide which geometric shapes you want to paint on the bottle. Options include triangles, squares, rectangles, hexagons, or a combination of shapes.
2.Masking Tape: Use masking tape to outline the geometric shapes on the bottle. Press down firmly to create clean lines and prevent paint from bleeding under the tape.
3.Apply Base Coat: Paint the entire bottle with a base coat of paint in the color of your choice. This will serve as the background for your geometric shapes. Allow the base coat to dry completely.
4.Paint Geometric Shapes: Once the base coat is dry, carefully paint inside the masked areas with acrylic paint or glass paint. Use a small brush for precision or paint markers for easier application. Apply multiple coats as needed for opacity.
5.Remove Masking Tape: Once the paint is dry to the touch, gently peel off the masking tape to reveal clean, crisp edges. Take care not to smudge the paint as you remove the tape.
6.Touch-Up: Use a fine-tipped brush or paint marker to touch up any areas where the paint may have bled under the tape or to refine the edges of the shapes.
7.Allow to Dry: Let the painted geometric shapes dry completely before handling or displaying the bottle. This may take several hours depending on the type of paint used.
5. Stripes
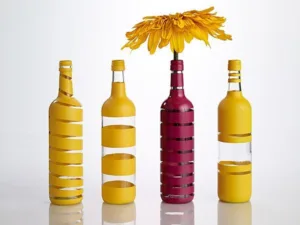
1.Plan Your Design: Decide the width and spacing of the stripes you want to paint on the bottle. You can use masking tape to create straight lines or paint freehand for a more organic look.
2.Masking Tape: If you prefer clean, straight lines, use masking tape to outline the areas where you want the stripes to be. Press down firmly to create clean edges.
3.Apply Base Coat: Paint the entire bottle with a base coat of paint in the color of your choice. This will serve as the background for your stripes. Allow the base coat to dry completely.
4.Paint Stripes: Once the base coat is dry, carefully paint the areas between the masking tape with acrylic paint or glass paint. Use a small brush for precision or paint markers for easier application. Apply multiple coats as needed for opacity.
5.Remove Masking Tape: Once the paint is dry to the touch, gently peel off the masking tape to reveal clean, crisp edges. Take care not to smudge the paint as you remove the tape.
6.Touch-Up: Use a fine-tipped brush or paint marker to touch up any areas where the paint may have bled under the tape or to refine the edges of the stripes.
7.Allow to Dry: Let the painted stripes dry completely before handling or displaying the bottle. This may take several hours depending on the type of paint used.
6.Polka Dots
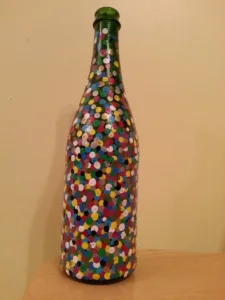
1.Plan Your Design: Decide the size and spacing of the polka dots you want to paint on the bottle. You can use different-sized circular objects as stencils or paint freehand for a more organic look.
2.Masking Tape (Optional): If you want precise placement of the polka dots, use masking tape to outline the areas where you want them to be. Press down firmly to create clean edges.
3.Apply Base Coat: Paint the entire bottle with a base coat of paint in the color of your choice. This will serve as the background for your polka dots. Allow the base coat to dry completely.
4.Paint Polka Dots: Once the base coat is dry, dip the end of a small paintbrush, pencil eraser, or round sponge into acrylic paint or glass paint. Carefully dot the paint onto the bottle in the desired locations to create the polka dots. Space them evenly and adjust the pressure to control the size of the dots.
5.Repeat: Continue dotting the paint onto the bottle until you’ve achieved the desired number and arrangement of polka dots. You can use multiple colors for a fun and playful look.
6.Remove Masking Tape (if used): If you used masking tape, gently peel it off to reveal clean, crisp edges around the polka dots. Take care not to smudge the paint as you remove the tape.
7.Touch-Up: Use a fine-tipped brush or paint marker to touch up any areas where the paint may have bled or to refine the edges of the polka dots.
8.Allow to Dry: Let the painted polka dots dry completely before handling or displaying the bottle. This may take several hours depending on the type of paint used.
7.Vintage Labels
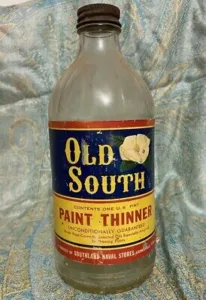
1.Design Your Labels: Research vintage label designs for inspiration, or create your own using a graphic design software or by hand. Vintage labels often feature ornate fonts, decorative borders, and aged-looking textures.
2.Print or Draw the Labels: Once you have your designs ready, print them out on label paper or trace them onto adhesive paper. Alternatively, you can hand-draw the labels using markers or paint pens.
3.Cut Out the Labels: Carefully cut out each label along the edges using scissors or a craft knife. Take your time to ensure clean and precise cuts.
4.Adhere the Labels: Peel off the backing of each label and carefully adhere them to the desired areas on the glass bottle. Smooth out any air bubbles or wrinkles with your fingers to ensure a clean application.
5.Distress the Labels (Optional): To give the labels a vintage look, you can distress them by lightly sanding the edges with fine-grit sandpaper or rubbing them with a damp cloth. This will create a worn and aged appearance.
6.Seal the Labels (Optional): Consider sealing the labels with a clear sealant or varnish to protect them from moisture and wear. This will also enhance the vintage look of the labels.
7.Allow to Dry: Let the labels dry completely before handling or displaying the bottle. This may take several hours depending on the type of adhesive and sealant used.
With attention to detail and a touch of creativity, you can create charming vintage labels on glass bottles to add character and nostalgia to your decor.
8.Ocean Waves
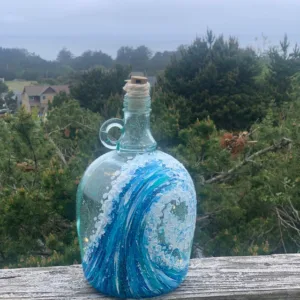
1.Sketch the Design: Use a pencil to lightly sketch the outline of the ocean waves onto the glass bottle. You can draw simple wave shapes or more intricate designs depending on your preference.
2.Choose Your Colors: Select acrylic paints in shades of blue and green to represent the ocean. Consider using different tones and hues to add depth and dimension to your waves.
3.Paint the Base Coat: Start by painting the entire bottle with a base coat of light blue paint. This will serve as the background color for your ocean waves. Allow the base coat to dry completely.
4.Paint the Waves: Once the base coat is dry, use a fine-tipped brush to paint the waves onto the bottle. Start with the darkest shade of blue at the bottom of the waves and gradually lighten the color as you move upward. Use quick, flowing brushstrokes to create the shape of the waves.
5.Add Highlights: To add depth to your waves, use a lighter shade of blue or white paint to add highlights along the crest of each wave. This will create the illusion of sunlight reflecting off the water.
6.Paint Foam and Splashes (Optional): For a more realistic look, you can paint white foam and splashes at the top of each wave using white paint. Use a small brush or paint marker to add these details with quick, flicking motions.
7.Blend and Soften: Use a clean, damp brush to blend and soften the edges of the waves, creating a smooth transition between colors. This will help to create a more realistic and dynamic ocean waves design.
8.Allow to Dry: Let the painted waves dry completely before handling or displaying the bottle. This may take several hours depending on the type of paint used.
9.Optional: Seal the Paint: Consider sealing the painted surface with a clear sealant or varnish to protect the design and add a glossy finish.
With patience and attention to detail, you can create a beautiful ocean waves design on a glass bottle, capturing the serene beauty of the sea.
9.Galaxy Effect
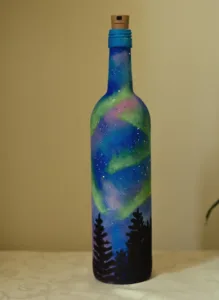
1.Sketch the Design: Use a pencil to lightly sketch the outline of the galaxy onto the glass bottle. You can draw swirling patterns, stars, and celestial bodies to create the desired effect.
2.Choose Your Colors: Select acrylic paints in deep blues, purples, blacks, and metallic shades like silver and gold. Consider using iridescent or glitter paints to add dimension and sparkle to your galaxy.
3.Paint the Base Coat: Start by painting the entire bottle with a base coat of black or dark blue paint. This will serve as the background for your galaxy. Allow the base coat to dry completely.
4.Create the Galaxy Background: Once the base coat is dry, use a sponge or a dry brush to dab on layers of dark blue, purple, and black paint to create a cloudy, nebulous background. Blend the colors together to create a seamless transition between shades.
5.Add Stars: Dip a small paintbrush into white or metallic paint and flick it onto the bottle to create stars. You can also use a toothbrush or splatter technique to create clusters of stars. Vary the size and density of the stars for a more realistic effect.
6.Paint Nebulae and Galactic Clouds: Use a fine-tipped brush to paint swirling patterns of color across the galaxy background to represent nebulae and galactic clouds. Experiment with different shades of blue, purple, and pink to create depth and dimension.
7.Add Details: Use a fine-tipped brush or paint marker to add details like shooting stars, planets, and moons to the galaxy design. You can also use metallic or glow-in-the-dark paint to highlight certain elements and add visual interest.
With patience and creativity, you can create a stunning galaxy effect on a glass bottle, capturing the beauty and mystery of outer space.
10.Graffiti Art
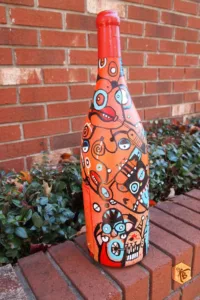
1.Sketch Your Design: Use a pencil to lightly sketch your graffiti design onto the glass bottle. You can draw letters, shapes, and patterns to create your desired graffiti art style.
2.Choose Your Colors: Select acrylic paints in vibrant colors that pop against the background of the glass bottle. Consider using a variety of colors to add depth and dimension to your graffiti art.
3.Paint the Base Coat: Start by painting the entire bottle with a base coat of white or light-colored paint. This will help the colors of your graffiti design to stand out and pop against the glass surface. Allow the base coat to dry completely.
4.Outline Your Design: Once the base coat is dry, use a fine-tipped brush or paint marker to outline your graffiti design with black or dark-colored paint. This will help to define the shapes and letters of your design and give it a bold, graphic look.
5.Fill in the Colors: Once the outline is complete, use a larger brush or paint markers to fill in the colors of your graffiti design. Apply multiple coats as needed to achieve the desired opacity and vibrancy of the colors.
6.Add Details and Effects: Experiment with different techniques such as shading, blending, and splattering to add depth and texture to your graffiti art. You can also use stencils or masking tape to create clean lines and shapes within your design.
With creativity and attention to detail, you can create striking graffiti art on a glass bottle, adding a bold and urban-inspired touch to your decor.
Conclusion
There are so many ways to repurpose and decorate glass bottles. All you need is your creativity, and you’ll be able to create containers, decors, and vases out of the empty glass jars in your kitchen.
If you need bottles and jars for commercial or personal use, GlassyPack has a full range of glass bottles and containers. Check out our website to view the products and services that we are currently offering.


